1. 缓存的概念。
1.1. 什么是缓存(cache)
1) cache是高速缓冲存储器,主要解决频繁使用的数据快速访问的问题。
2) 如果两个硬件或者软件之间的速度存在较大差异,主要使用缓存协调两者的速度差异。
1.2. 缓存的分类
1) 操作系统磁盘缓存:减少磁盘机械操作。
2) 数据库缓存:减少应用程序对数据库服务器的IO操作。
3) web服务器缓存:减轻web服务器的压力。
4) 浏览器缓存:访问速度快,提升用户体验度,减轻网站压力。
2. redis(单机版)实现mybatis的二级缓存
2.1. 环境准备
使用maven搭建一套ssm框架,并创建测试类查询emp表。测试代码如下:
/**
* 不使用缓存的查询时间
*/
public static void main(String[] args) {
    ApplicationContext ac =new ClassPathXmlApplicationContext("applicationContext.xml");
    EmpMapper empMapper=(EmpMapper) ac.getBean("empMapper");
    Long begin=System.currentTimeMillis();
    empMapper.findAllEmp();
    Long end=System.currentTimeMillis();
    System.out.println("花费时间:"+(end-begin));
}
结果截图:

2.2. 配置mybais的二级缓存
1) 修改配置文件mapper.xml
加上
<cache eviction="LRU" type="com.aaa.util.RedisCache" />,<!-- eviction:定义缓存的移除机制;默认是LRU(least recently userd,最近最少使用),还有FIFO(first in first out,先进先出) -->
2) 修改配置文件applicationContext.xml,开启mabatis缓存
<!-- 开启缓存支持 -->
<property name="configurationProperties">
<props>
<prop key="cacheEnabled">true</prop>
<!-- 查询时,关闭关联对象即时加载以提高性能 -->
<prop key="lazyLoadingEnabled">false</prop>
<!-- 设置关联对象加载的形态,此处为按需加载字段(加载字段由SQL指定),不会加载关联表的所有字段,以提高性能 -->
<prop key="aggressiveLazyLoading">true</prop>
<!-- 对于未知的SQL查询,允许返回不同的结果集以达到通用的效果 -->
<prop key="multipleResultSetsEnabled">true</prop>
<!-- 允许使用列标签代替列名 -->
<prop key="useColumnLabel">true</prop>
<!-- 允许使用自定义的主键值(比如由程序生成的UUID 32位编码作为键值),数据表的PK生成策略将被覆盖 -->
<prop key="useGeneratedKeys">true</prop>
<!-- 给予被嵌套的resultMap以字段-属性的映射支持 -->
<prop key="autoMappingBehavior">FULL</prop>
<!-- 对于批量更新操作缓存SQL以提高性能 -->
<prop key="defaultExecutorType">BATCH</prop>
<!-- 数据库超过25000秒仍未响应则超时 -->
<prop key="defaultStatementTimeout">25000</prop>
</props>
</property>
3) 添加配置文件spring-redis.xml
<!-- redis连接池配置 -->
<bean id="poolConfig" class="redis.clients.jedis.JedisPoolConfig">
<property name="maxIdle" value="2000" />
<property name="maxTotal" value="20000" />
<property name="minEvictableIdleTimeMillis" value="300000"></property>
<property name="numTestsPerEvictionRun" value="3"></property>
<property name="timeBetweenEvictionRunsMillis" value="60000"></property>
<property name="maxWaitMillis" value="20000" />
<property name="testOnBorrow" value="false" />
</bean>
<!-- Spring-redis连接池管理工厂 -->
<bean id="jedisConnectionFactory" class="org.springframework.data.redis.connection.jedis.JedisConnectionFactory">
<property name="hostName" value="192.168.153.164" />
<property name="port" value="6379" />
<property name="poolConfig" ref="poolConfig" />
</bean>
<!-- 使用中间类解决RedisCache.jedisConnectionFactory的静态注入,从而使MyBatis实现第三方缓存 -->
<bean id="redisCache" class="com.aaa.util.RedisCacheTransfer">
<property name="jedisConnectionFactory" ref="jedisConnectionFactory"></property>
</bean>
4) 创建mybatis cache接口的实现类RedisCache
/**
* @author fuyadong
* @description 使用第三方缓存服务器,处理二级缓存
* @company 付亚东
* 2017-6-29下午2:16:56
*/
public class RedisCache implements Cache {
private static JedisConnectionFactory jedisConnectionFactory;
private final String id;
private final ReadWriteLock readWriteLock = new ReentrantReadWriteLock();
public RedisCache(final String id){
if (id == null) {
throw new IllegalArgumentException("cache instances require an ID");
}
this.id = id;
}
/**
*
* @description: 清空redis缓存
* @author
* @param
* @return
*/
@Override
public void clear() {
RedisConnection connection = null;
try {
connection = jedisConnectionFactory.getConnection();
connection.flushDb();//清空redis中的数据
connection.flushAll();//#移除所有key从所有库中
} catch (Exception e) {
e.printStackTrace();
}finally{
if (connection != null) {
connection.close();
}
}
}
@Override
public String getId() {
return this.id;
}
/**
*
* @description: 根据key获取redis缓存中的值
* @author
* @param
* @return
*/
@Override
public Object getObject(Object key) {
System.out.println("--------------------------------key:["+key+"]");
Object result = null;
RedisConnection connection = null;
try {
connection = jedisConnectionFactory.getConnection();
RedisSerializer<Object> serializer = new JdkSerializationRedisSerializer();
//serializer.serialize(key)将key序列化
//connection.get(serializer.serialize(key))根据key去redis中获取value
//serializer.deserialize将value反序列化
result = serializer.deserialize(connection.get(serializer.serialize(key)));
} catch (Exception e) {
e.printStackTrace();
}finally{
if (connection != null) {
connection.close();
}
}
return result;
}
@Override
public ReadWriteLock getReadWriteLock() {
return this.readWriteLock;
}
@Override
public int getSize() {
int result = 0;
RedisConnection connection = null;
try {
connection = jedisConnectionFactory.getConnection();
result = Integer.valueOf(connection.dbSize().toString());
} catch (Exception e) {
e.printStackTrace();
}finally{
if (connection != null) {
connection.close();
}
}
return result;
}
/**
*
* @description: 将数据保存到redis缓存
* @author
* @param
* @return
*/
@Override
public void putObject(Object key, Object value) {
System.out.println(">>>>>>>>>>>>>>>>>>>>>>>>>>>>>>>>key:"+key);
RedisConnection connection = null;
try {
connection = jedisConnectionFactory.getConnection();
RedisSerializer<Object> serializer = new JdkSerializationRedisSerializer();
System.out.println("**"+serializer.serialize(key));
//serializer.serialize(value)将value序列化,serializer.serialize(key)将key序列化
connection.set(serializer.serialize(key), serializer.serialize(value));
} catch (Exception e) {
e.printStackTrace();
}finally{
if (connection != null) {
connection.close();
}
}
}
/**
*
* @description: 根据key清除redis缓存中对应 的值
* @author
* @param
* @return
*/
@Override
public Object removeObject(Object key) {
RedisConnection connection = null;
Object result = null;
try {
connection = jedisConnectionFactory.getConnection();
RedisSerializer<Object> serializer = new JdkSerializationRedisSerializer();
result = connection.expireAt(serializer.serialize(key), 0);
} catch (Exception e) {
e.printStackTrace();
}finally{
if (connection != null) {
connection.close();
}
}
return result;
}
public static void setJedisConnectionFactory(JedisConnectionFactory jedisConnectionFactory) {
RedisCache.jedisConnectionFactory = jedisConnectionFactory;
}
5) 创建中间类,解决RedisCache.jedisConnectionFactory的静态注入,从而使MyBatis实现第三方缓存
/**
* @author fuyadong
* @description 创建中间类RedisCacheTransfer,完成RedisCache.jedisConnectionFactory的静态注入
* @company 付亚东
* 2018-1-12上午8:46:18
*/
public class RedisCacheTransfer {
public void setJedisConnectionFactory(JedisConnectionFactory jedisConnectionFactory) {
RedisCache.setJedisConnectionFactory(jedisConnectionFactory);
}
}
6) 测试类
/**
* 使用缓存的查询时间
*/
public static void main(String[] args) {
ApplicationContext ac =new ClassPathXmlApplicationContext("applicationContext.xml","spring-redis.xml");
EmpMapper empMapper=(EmpMapper) ac.getBean("empMapper");
Long begin=System.currentTimeMillis();
List<Emp> empList = empMapper.findAllEmp();
System.out.println("员工数:"+empList.size());
Long end=System.currentTimeMillis();
System.out.println("花费时间:"+(end-begin));
}
7) 测试效果
第一次查询

3.2. 测试效果
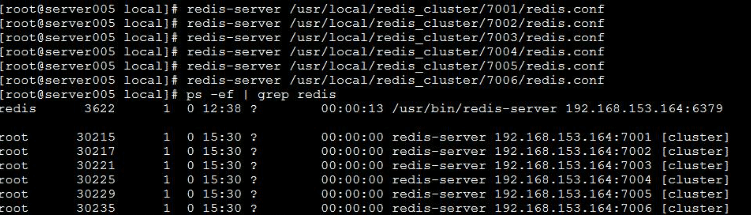
1) 启动redis集群
redis-server /usr/local/redis_cluster/7001/redis.conf
redis-server /usr/local/redis_cluster/7002/redis.conf
redis-server /usr/local/redis_cluster/7003/redis.conf
redis-server /usr/local/redis_cluster/7004/redis.conf
redis-server /usr/local/redis_cluster/7005/redis.conf
redis-server /usr/local/redis_cluster/7006/redis.conf
2) 清空集群中的所有key,要在主节点上操作
使用FLUSHALL命令在所有的主节点
3) 第一次查询
4) 第二次查询
版权付亚东笔记博客所有,禁止转载!!付亚东Java笔记博客
我的笔记博客版权我的笔记博客版权