主要介绍的是SpringBoot整合Netty。在使用Netty之前,建议先了解Netty的基本原理,请参阅疯狂创客圈。
这里仅仅是使用Netty的第一步,这里介绍一个最简单的Demo——EchoServer,也就是回写服务器。就是无论客户端发啥字符串到服务器端,服务器端接收字符串后直接回写到客户端。
源码下载链接:
本篇内容纲要
环境要求
Spring +netty 服务器端
Spring +netty 客户端
Spring读取配置文件中的属性值
环境要求
JDK::1.8
Netty::4.0或以上(不包括5)
<java.version>1.8</java.version>
<springboot>1.5.9.RELEASE</springboot>
<netty.version>4.0.33.Final</netty.version>
Spring +netty 服务器端
回写服务器 Echo Server 程序主要由两部分组成:
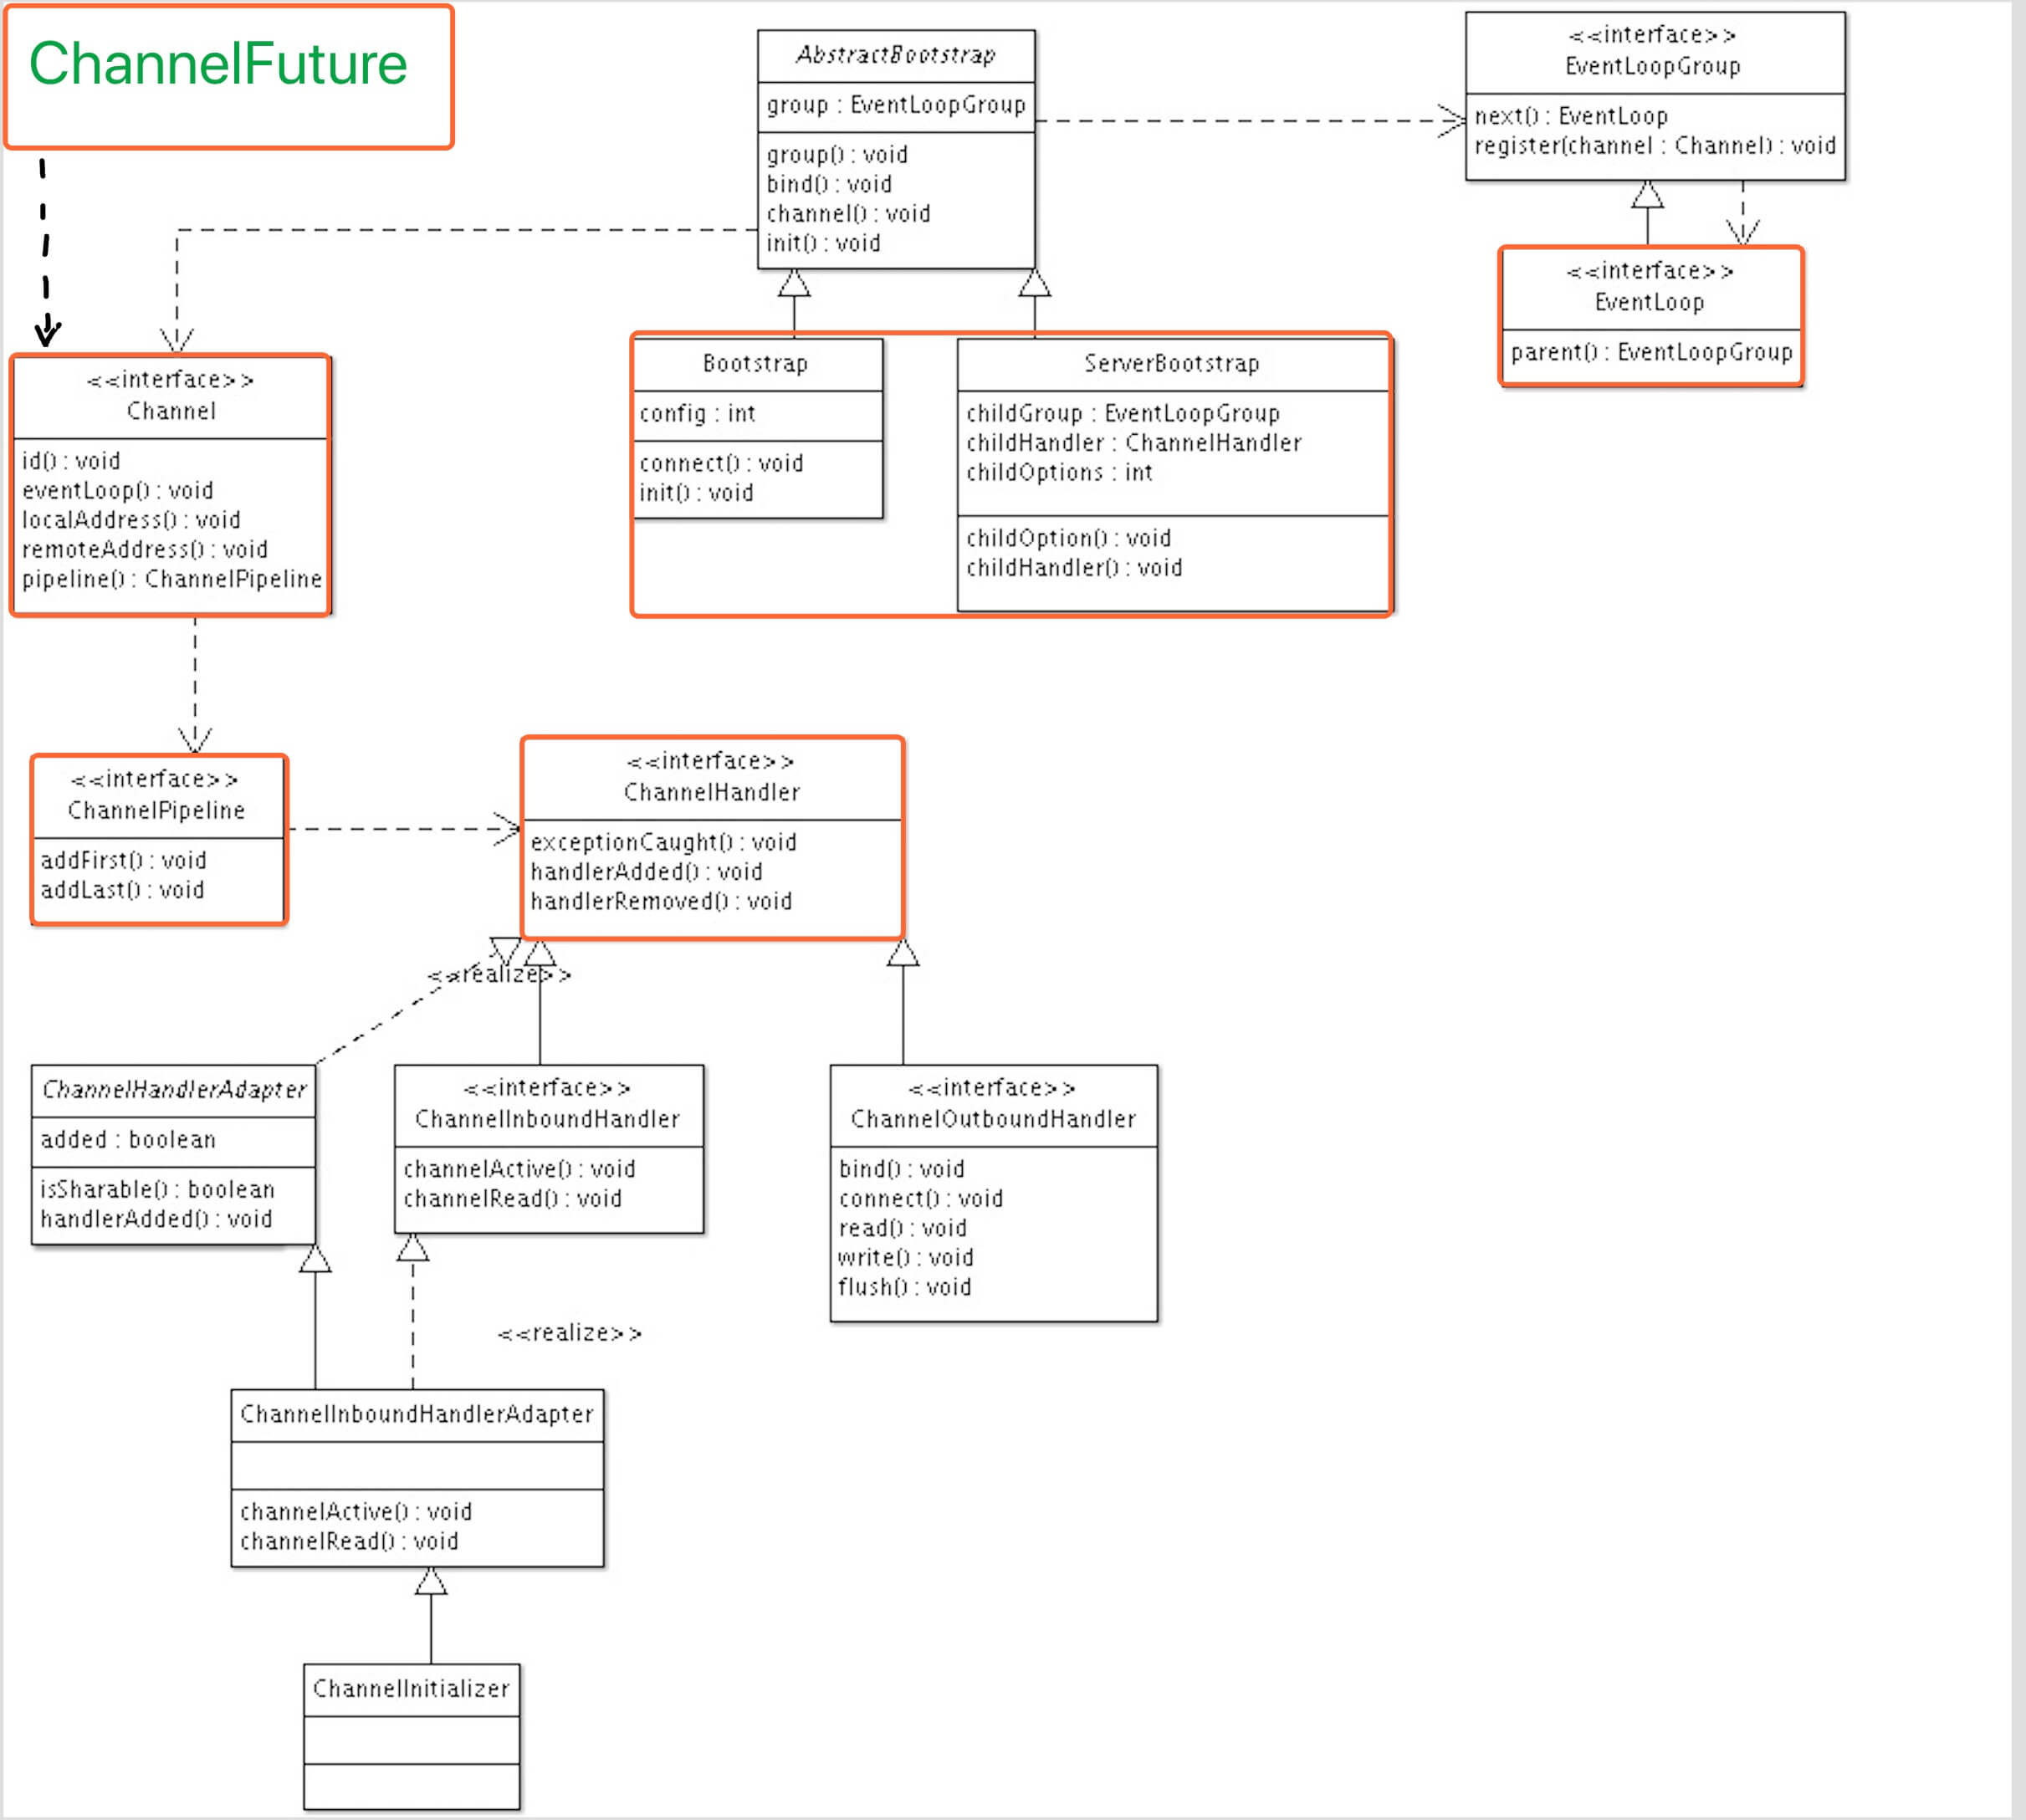
ServerBootstrap:服务器启动引导器。负责配置服务器端基本信息,并且完成服务器的启动
EchoServerHandler:回写的业务逻辑处理器
ServerBootstrap
首先是编写服务端的启动类,代码中相应的注释在写得很详细。主要的步骤如下:
创建一个ServerBootstrap实例
创建一个EventLoopGroup来处理各种事件,如处理链接请求,发送接收数据等。
设置本地监听端口 InetSocketAddress( port)
设置 childHandler 来设置通道初始化类。并且在通道初始化时,加入回写的业务逻辑处理器EchoServerHandler到服务器通道的pipeline中 。childHandler 在通道初始化时,会被执行一次。
所有准备好之后调用ServerBootstrap.bind() 方法绑定 Server
不过需要注意的是,在不使用Spring的环境中,是通过main方法直接启动服务端,因此是直接new一个处理器echoServerHandler 对象。而在和Spring 整合之后,我们需要将 echoServerHandler 处理器交给springBoot去管理。
ServerBootstrap 代码如下:
@Service("EchoServer")
public class EchoServer
{
    // 服务器端口
    @Value("${server.port}")
    private int port;
    // 通过nio方式来接收连接和处理连接
    private static EventLoopGroup boss = new NioEventLoopGroup();
    private static EventLoopGroup work = new NioEventLoopGroup();

    // 启动引导器
    private static ServerBootstrap b = new ServerBootstrap();
    @Autowired
    private EchoServerHandler echoServerHandler;

    public void run()
    {
        try
        {
            b.group(boss, work);
            // 设置nio类型的channel
            b.channel(NioServerSocketChannel.class);
            // 设置监听端口
            b.localAddress(new InetSocketAddress(port));
            // 设置通道初始化
            b.childHandler(new ChannelInitializer<SocketChannel>()
            {
                //有连接到达时会创建一个channel
                protected void initChannel(SocketChannel ch) throws Exception
                {
                    // pipeline管理channel中的Handler
                    // 在channel队列中添加一个handler来处理业务
                    ch.pipeline().addLast("echoServerHandler",echoServerHandler);
                }
            });
            // 配置完成,开始绑定server
            // 通过调用sync同步方法阻塞直到绑定成功

            ChannelFuture f = b.bind().sync();
            System.out.println(EchoServer.class.getName() +
                    " started and listen on " + f.channel().localAddress());

            // 监听服务器关闭事件
            // 应用程序会一直等待,直到channel关闭
            f.channel().closeFuture().sync();
        } catch (Exception e)
        {
            e.printStackTrace();
        } finally
        {
            // 关闭EventLoopGroup,释放掉所有资源包括创建的线程
            work.shutdownGracefully();
            boss.shutdownGracefully();
        }

    }
}
业务逻辑ServerHandler:
要想处理接收到的数据,我们必须继承ChannelInboundHandlerAdapter接口,重写里面的channelRead方法,每当有数据到达,此方法就会被调用(一般是Byte类型数组),我们就在这里写我们的业务逻辑:
@Service("echoServerHandler")
public class EchoServerHandler extends ChannelInboundHandlerAdapter {

    /**
     * 建立连接时,发送一条消息
     */
    @Override
    public void channelActive(ChannelHandlerContext ctx) throws Exception {
        System.out.println("连接的客户端地址:" + ctx.channel().remoteAddress());
        super.channelActive(ctx);
    }

    public void channelRead(ChannelHandlerContext ctx, Object msg) {
        try {
            System.out.println("server received data :" + msg);
            ctx.write(msg);//写回数据,
        } finally {
            ReferenceCountUtil.release(msg);
        }
    }

    public void channelReadComplete(ChannelHandlerContext ctx) {
        //flush掉所有写回的数据
        ctx.writeAndFlush(Unpooled.EMPTY_BUFFER).addListener(ChannelFutureListener.CLOSE);
        //当flush完成后关闭channel
    }

    public void exceptionCaught(ChannelHandlerContext ctx, Throwable cause) {
        //捕捉异常信息
        cause.printStackTrace();
        // 出现异常时关闭channel
        ctx.close();
    }
}
关于异常处理:
我们在上面程序中也重写了exceptionCaught方法,这里就是对当异常出现时的处理。
Spring +netty 客户端
EchoClient 扮演如下角色:
连接到Server
向Server写数据,
等待Server返回数据
回写客户端程序EchoClient 主要由两部分组成:
Bootstrap:客户端启动引导器。负责配置客户端基本信息,并且完成客户端的启动
EchoClientHandler :客户端业务逻辑处理器
EchoClient Bootstrap的过程:
和Server端类似,只不过Client端要同时指定连接主机的IP和Port。
创建一个Bootstrap实例
创建一个EventLoopGroup 来处理各种事件,如处理链接请求,发送接收数据等。
定义需要连接到的远程服务器的InetSocketAddress,包含了IP+端口
设置 childHandler 来设置通道初始化类。并且在通道初始化时,加入客户端的业务逻辑处理器echoClientHandler 到服务器通道的pipeline中 。当连接完成之后,childHandler 会被执行一次 。
所有准备好之后调用 ServerBootstrap.connect() 方法连接Server
EchoClient Bootstrap的代码:
@Service("EchoClient")
public class EchoClient {
    // 服务器ip地址
    @Value("${server.ip}")
    private String host;
    // 服务器端口 @Value("${server.port}")
    private int port;
    // 通过nio方式来接收连接和处理连接
    private EventLoopGroup group = new NioEventLoopGroup();
    @Autowired
    private EchoClientHandler echoClientHandler;

    // /** * 唯一标记 */ private boolean initFalg = true;
// /** * 客户端的是Bootstrap,服务端的则是 ServerBootstrap。 * 都是AbstractBootstrap的子类。 **/
    public void run() {
        doConnect(new Bootstrap(), group);
    }

    // /** * 重连 */
    public void doConnect(Bootstrap bootstrap, EventLoopGroup eventLoopGroup) {
        ChannelFuture f = null;
        try {
            if (bootstrap != null) {
                bootstrap.group(eventLoopGroup);
                bootstrap.channel(NioSocketChannel.class);
                bootstrap.option(ChannelOption.SO_KEEPALIVE, true);
                bootstrap.remoteAddress(host, port);
                // 设置通道初始化
                bootstrap.handler(new ChannelInitializer<SocketChannel>() {
                    public void initChannel(SocketChannel ch) throws Exception {
                        ch.pipeline().addLast(echoClientHandler);
                    }
                });
                f = bootstrap.connect().addListener((ChannelFuture futureListener) -> {
                    final EventLoop eventLoop = futureListener.channel().eventLoop();
                    if (!futureListener.isSuccess()) {
                        System.out.println("与服务端断开连接!在10s之后准备尝试重连!");
                        eventLoop.schedule(() -> doConnect(new Bootstrap(), eventLoop), 10, TimeUnit.SECONDS);
                    }
                });
                if (initFalg) {
                    System.out.println("EchoClient客户端连接成功!");
                    initFalg = false;
                }
                // 阻塞
                f.channel().closeFuture().sync();
            }
        } catch (Exception e) {
            System.out.println("客户端连接失败!" + e.getMessage());
        }
    }
}
EchoClientHandler 客户端业务逻辑处理器
要想处理接收到的数据,我们必须继承ChannelInboundHandlerAdapter基类,重写里面的channelRead方法,每当有数据到达,此方法就会被调用(一般是Byte类型数组),我们就在这里写我们的业务逻辑:
@Service("echoClientHandler")
public class EchoClientHandler extends ChannelInboundHandlerAdapter {
    /**
     * 此方法会在连接到服务器后被调用
     */
    public void channelActive(ChannelHandlerContext ctx) {
        ctx.write(Unpooled.copiedBuffer("Netty rocks!", CharsetUtil.UTF_8));
    }

    /**
     * 业务逻辑处理
     */
    @Override
    public void channelRead(ChannelHandlerContext ctx, Object msg) throws Exception {
        // 如果不是protobuf类型的数据
        if (!(msg instanceof ByteBuf)) {
            System.out.println("未知数据!" + msg);
            return;
        }
        try {
            ByteBuf in = (ByteBuf) msg;
            System.out.println("Client received: " + ByteBufUtil.hexDump(in.readBytes(in.readableBytes())));
        } catch (Exception e) {
            e.printStackTrace();
        } finally {
            ReferenceCountUtil.release(msg);
        }
    }

    /**
     * 捕捉到异常
     */
    public void exceptionCaught(ChannelHandlerContext ctx, Throwable cause) {
        cause.printStackTrace();
        ctx.close();
    }
}
除了继承ChannelInboundHandlerAdapter基类,我们的业务Handler还可以继承 SimpleChannelInboundHandler 基类。
那么这两个有什么区别呢?
SimpleChannelInboundHandler在接收到数据后会自动release掉数据占用的Bytebuffer资源(自动调用Bytebuffer.release())。如果在channelRead方法返回前还没有写完数据,也就是当不能让它自动release时,就不能继承 SimpleChannelInboundHandler 基类。而继承ChannelInboundHandlerAdapter则不会自动释放,需要手动调用ReferenceCountUtil.release()等方法进行释放。
SimpleChannelInboundHandler还有一个好处,可以在泛型参数中,可以直接指定好传输的数据格式。所以继承该类,在处理数据时,不需要判断数据格式。而继承ChannelInboundHandlerAdapter则需要进行数据格式的判断和转换。
推荐在服务端去继承ChannelInboundHandlerAdapter,建议手动进行释放,防止数据未处理完就自动释放了。
Spring读取配置文件中的属性值
在Netty 的程序中,一般需要用到服务器ip和端口,最好的方式是放在配置文件中,方便修改。
Spring Boot 默认的配置文件名称为 application.properties,SpringApplication将从以下位置加载此文件:
当前目录下的/config子目录,
当前目录
一个classpath下的/config包
classpath 根路径(root)
一般情况下,工程在编译之后,application.properties 放在classpath 根路径下。
配置文件 application.properties
#端口号 server.port=8081
IPserver.ip=127.0.0.1
注意:文件名字不能错哦,是application.properties
关联配置项到类属性
在类域属性上通过@Value("${配置项}")指定关联属性,Spring Application会自动加载。
public class EchoServer { // 服务器端口 @Value("${server.port}") private int port; //... }启动配置项自动扫描
使用 @Configuration、@EnableAutoConfiguration 启动配置项的自动扫描。
//自动加载配置信息
@Configuration
@EnableAutoConfiguration
//使包路径下带有@Value的注解自动注入
//使包路径下带有@Autowired的类可以自动注入
@ComponentScan("com.crazymakercircle.nettydemo.server")
@SpringBootApplication
public class ServerApp {  // ........ }